1. DMR Basics
DMR (Digital Mobile Radio) is fast becoming the most popular digital mode for amateur usage. It started out in the comercial world championed by Motorola. There are a number of different derivatives of it which are still used commercially. DMR is an open standard making it easier to build and integrate. Like all new things it does come with new technical speak to also become familiar with. Below are these key terms with a brief definition to get you started.
More information about DMR can be found on the Digital Mobile Radio Association website.
1.1. DMRID
You will require a DMRID. DMRID is a unique 7 digit number which will be linked to one of your callsigns. You can have multiple DMRIDs assigned to the same callsign though they are limited so expect a request for justification if you request multiple.
Transmitting on DMR the DMRID is the number which is passed around rather than your callsign. For the UK the number will start 234 or 235. This needs to be requested from https://radioid.net. It’s free to do, you will need to create an account and upload a copy of your license. This usually takes 24 hours to complete. Once radioid have allocated your number it may take another 24 hours for it to be propagated to the RAYNET server.
1.2. Timeslot (TS)
With DMR we have 2 Timeslots, this means two calls can be held in parallel on the same frequency and within the 12.5Khz brandwidth. Each call is sliced into chunks and interleaved with the call on the other Timeslot.

When programming your radio to use a repeater you need to make a note of the Timeslot for a each Talkgroup. If you have a simplex hotspot then all the traffic will be on Timeslot 2.
1.3. Colour Code (CC)
This performs a simalar function as Continuous Tone-Coded Squelch System (CTCSS) tones used for analog radio. When using a hotspot the colour code will normally be 1. When using a repeater you will need to make sure your radio is set to the same as the repeater
1.4. Talkgroups (TG)
A talkgroup is a number like a phone number, this is how your traffic is routed around the DMR network. Users select to listen or transmit on a talkgroup and will then hear traffic for that talkgroup number.
1.4.1. On Hotspots using different Networks
So, you have your Hotspot. The next issue is which Talkgroups or Reflectors do you use? Obviously, this will be to some extent a personal decision. However, depending on which Network you are on, the choice may make all the difference to your DMR experience. Of the two UK Networks, Brandmeister offers the most Talkgroups and, with the Brandmeister API installed, the most control. Phoenix is more UK centric but has limited Talkgroup controls. If you only want to use one Network then select that as DMR Master; otherwise, you will have to use DMRGateway as the Master.
1.4.2. The Basics
In order to use a particular Talkgroup you need to do two things. The Network needs to be enabled on your Hotspot and there needs to be a Channel in your radio set to use the Hotspot and with the appropriate Talkgroup or Digital Contact ID, Group Call set. Then simply keying up the Channel will activate the Talkgroup. Note – you may need to key it up before you hear anything.
Changing channels to a different Talkgroup and keying that up will switch to that one instead. Except things are never that straight forward on DMR – it depends which Network you are on! The Hotspot is treated like a Repeater by the Networks, particularly by Phoenix. This means that Talkgroups may be timed out by the Network. For instance, listening to TG840 on Phoenix will necessitate keying it up at least every 15 minutes; this is different behaviour to RF repeaters that have defined Static Talkgroups (including 840 in East Anglia). The three different Networks discussed in this document all act differently in respect to keeping Talkgroups active on Hotspots:
Talkgroups can be either Static – available all the time, or Dynamic – non-static for a period available after you have used it, or until perhaps you chose another non-static one.
Brandmeister has configurable Statics, as well as dynamic and pseudo-statics.
Phoenix has fixed Statics and User Activated (dynamic) Talkgroups.
RAYNET has configurable Statics and remembers the last Talkgroup used as a Dynamic.
It is good practice not to ‘rag-chew’ on the calling or primary channels. Once a contact has been established (QSO) you should change Talkgroup (QSY) to one of the many chat or tactical Talkgroups. However, a short ‘over’ is permissible. The problem is the wider the coverage of a Static Talkgroup the more repeaters you use; blocking their use by other people. It only takes one irresponsible operator to chat to people on World Wide 1 to effectively bring down the entire Phoenix repeater base in the UK.
1.4.3. Brandmeister
This network is the most comprehensive, with around 1573 Talkgroups. For a full list go to https://www.pistar.uk/dmr_bm_talkgroups.php

Fig. 1.1 Brandmeister GUI
Talkgroups can be set Static using the controls added to the dashboard using the Brandmeister GUI. This lists the active Talkgroups and allows you to change them. The Brandmeister support for Reflectors is to be discontinued; Talkgroup 9 will then be spare.
On a Simplex Hotspot keying up a non-static Talkgroup will make it auto-static, sort of an extra Static one. If you then key up another Talkgroup that is not Static this takes the place of the auto-static one; which then becomes Dynamic for a period of time. You can still use Talkgroup 4000 to disconnect the current Talkgroup if sent as a private call.
DMR uses 2 Time Slots. Brandmeister uses whichever Time Slot the repeater keeper has set, or either on a Duplex Hotspot. Simplex Hotspots only have Time Slot 2.
Some recommended Talkgroups:
1 World Wide English
2 EU W
235 UK W
2351 UK Talk 1
2353 UK Talk 3
23515 East Anglia
310-319 Tac1 – Tac 10
3100 USA
31001 USA Net 1
31002 USA Net 2
31000 Echo
4000 Disconnect
9 Local (Reflectors)
91 World Wide
92 EU Wide
93 Nth America
94 Asia
95 Australia / NZ.
1.4.4. Phoenix
This network is particularly strong in the UK with 52 Talk Groups, but does have International coverage and it is linked to the 228 DMR+ ones. (In fact, access to Phoenix from a Hotspot is via the DMR+ Network; confused?
For Phoenix Talkgroups go to http://www.dmr-uk.net/index.php/layout/
For DMR+ go to https://www.pistar.uk/dmr_dmr+_talkgroups.php
On the Repeater Network, Phoenix Talkgroups are either Static or User Activated (aka Dynamic). Static Talkgroups are always on, User Activated will not be heard until keyed up. They then become ‘Static’ for 15 minutes after each outgoing transmission. Make sure you key up before they time out if you are only listening, or are on a protracted Net. In the list below Static Talkgroups on Repeaters are in BOLD. Also, Phoenix defines particular Time Slots for particular Talkgroups.
The Phoenix Network treats Hotspots differently in that no Talkgroups are Static and on a Simplex Hotspot everything is on Time Slot 2 regardless. On a Duplex Hotspot either Time Slot can be used, providing you are not running DMRGateway.
Unlike Brandmeister, there are no controls on the dashboard to control Talkgroups. There is, however, an Options field in the DMR+ Configuration section. The default contents of this are:
StartRef=4000;ReLinkTime=60;UserLink=1; TS2_1=9;
This takes some explaining. When the Pi-star starts up it read this line and does the following:
StartRef=4000; This is the Reflector to use. 4000 means disconnect.
ReLinkTime=60; If the user changes the reflector from the initial one, restore it after 60 minutes.
UserLink=1; Allows the user to change the reflector. Set it to ‘0’ to inhibit.
TS2_1=9; Sets Talkgroup 9 as static. You can set up to 5 static Talkgroups per Timeslot (TS2_2=840; say)
On a Duplex Hotspot there are two Time Slots. So, in the above Option field TS1_1= Time Slot 1 and TS2_1 = Time Slot 2. Time Slot 1 only works on a Duplex Hotspot running DMR+; and not if it is running DMRGateway (as the default Talkgroup Rewrite rules routes all traffic over Time Slot 2 for DMR+ Talkgroups, but this can be changed)
If you use the Options field to set things it may be lost if you subsequently change other settings. There is no way of inhibiting individual Talkgroups set using this command. This means if you set a busy Talkgroup you will not be able to switch away from it whilst busy.
Some recommended Talkgroups are as follows (use Hubnet 23536 at your own peril):
Time Slot 1:
1 World Wide
13 WW English
113 WW English
119 WW
123 WW English
129 WW
235 UK Wide
80 UK Wide 1 – 84 UK Wide 5
9 Local
Time Slot 2:
840 East Anglia
841 Suffolk Coastal
9 Local
9990 Echo (Regional Talkgroups are Static in their own area and User Activated everywhere else)
1.4.5. RAYNET-UK
This network is private and the Talkgroups are not available on the public Networks. The available Talkgroups will depend on the Admin settings for each individual user. Each Talkgroup can be configured to be on either or both Time Slots. If you have a Duplex Hotspot you can have some on each Time Slot and some on Both, depending on your requirements.
Some recommended ones are as follows:
5023531 National Activity
5089900 Nat Net
5089901 Nat Call 1
5089910 Nat Event 1
5089911 Nat Event TG 1
5089999 Echo Test
Zonal set as above (50904xx for Suffolk)
County set as above (50858xx for Suffolk)
Group set (50260xx for East Suffolk)
1.4.6. Switching Networks within Pi-star using DMR Gateway
DMR Gateway allows you to connect to multiple DMR Networks at the same time but requires additional work; both in the Pi-star configuration and in the Code Plug(s) for your radio(s). This is to allow the Hotspot to determine which DMR Network you are trying to access from your radio. By default, almost all traffic will be routed over the Brandmeister Network.
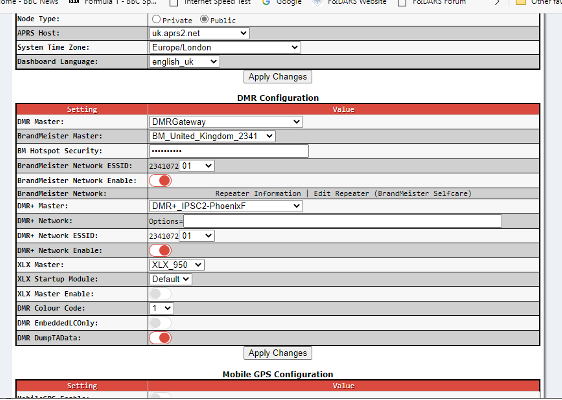
Fig. 1.2 DMR Gateway
Whilst running DMR Gateway (and if you want the RAYNET private server you will have to be even if you just want that one Network) you can enable and disable Brandmeister and Phoenix from the Configuration menu on the web interface. Just scroll down to the DMR Configuration section. Move the slider to disable either Brandmeister or DMR+ to disable Brandmeister or Phoenix respectively. Then click on Apply Changes.
Changing the Status of the RAYNET DMR server is a bit more difficult. To alter this, you need to click on Configuration> Expert on the Pi-star tool bar and then under Full Edit DMR GW. Scroll down to the [DMR Network 4] section. Change the line Enabled=1 to Enabled=0 to turn it off, and from 0 to 1 to turn it on. Click on Apply Changes.
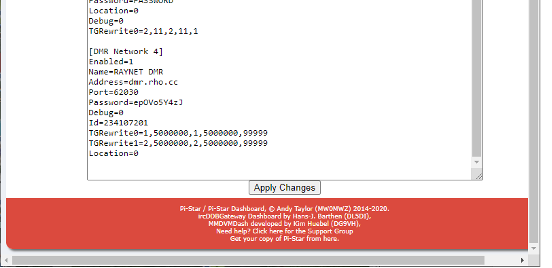
Fig. 1.3 RAYNET Settings
If you use the dashboard to turn on a specific Network, by turning off the ones you don’t want, you can listen to one Network at a time. In Brandmeister mode you can connect, say, to TG 3211 and it will work. Alternatively, in Phoenix mode you can use TG 235 and it might. However, for Phoenix to work you have to use redirect statements in the Pi-star configuration and have an extra set of Talkgroups for Phoenix through the Hotspot.
1.4.7. Phoenix Talkgroup Redirects
In order to get Phoenix to co-exist with Brandmeister (or any other DMR Networks for that matter) using DMRGateway you need to ensure there is no overlap in Talkgroup IDs. The way to do this is to add additional Talkgroup IDs to your radio, prefixing each existing Phoenix ID with an’8’ and as many leading ‘0’s as required to make them 6 digits long.
For instance, TG 235 becomes TG 800235, TG 840 becomes TG 800840, etc. These new Talkgroups do not replace the Repeater originals and are only used to create Channels assigned to a Hotspot in DMRGateway mode.
Having done this, you then need to change the Pi-star configuration file to suit. It is always good practice to back up your configuration before making major changes! From the Dashboard you need to select ‘Configuration’, ‘Expert’ and then in the Full Edit: section select ‘DMR GW’. In the [DMR Network 2] section replace all the existing TGRewrite and PCRewrite lines with the following:
TGRewrite0=2,8,2,9,1
TGRewrite1=2,800505,2,505,1
TGRewrite2=2,800800,2,800,100
TGRewrite3=2,803801,2,3801,8
TGRewrite4=2,823531,2,23531,1
TGRewrite5=2,809990,2,9990,1
TGRewrite6=2,800001,1,1,9999
TGRewrite7=2,800001,2,1,9999
PCRewrite0=2,804000,2,4000,1001
Select the “Apply Changes” button and wait for the Hotspot to restart. Then when you transmit on a channel with a modified Phoenix Talkgroup ID, this lookup table ensures the call is routed to the Phoenix Network. If using a Duplex Hotspot, they prevent the use of Time Slot1 for the Phoenix Network, everything works on Time Slot 2.
1.4.8. Monitoring Concurrent Networks – A Warning
If you run DMRGateway and have multiple Networks active at the same time you may experience problems with Static Talkgroups.
Perhaps you are listening to BM 3100 USA. If during a quite period a QSO is started on a Talkgroup on a different Network that is also Static, say Phoenix 840 East Anglia, this will become the current Talkgroup being handled by your Hotspot. The chances are you won’t hear this because you are focused on the original Talkgroup (unless you are running promiscuous mode on Talkgroups of course)
More importantly you would have no way of ‘killing’ the unwanted QSO and returning to your original QSO! The Brandmeister API allows you to drop Static and Dynamic Talkgroups from your Pi-star dashboard. The RAYNET private server allows you to do the same but from the server web page. However, if you have used the Options field to set Static Talkgroups on Phoenix you will be unable to clear them without clearing the Options filed and restarting the Pi-star; and that doesn’t always work straight away.
If you set a busy Talkgroup as Static you may not be able to change Talkgroups at all until there is a big enough gap in the QSO to break away – it has been known for users to be stuck on Hubnet against their will! If you are going to be on a Net, say, you would need to use the different Network’s controls to remove all the other Statics before you start.
If you really must be able to use multiple Networks concurrently ideally you need a Duplex Hotspot. These are more difficult to set up (perhaps requiring additional channels in your Code Plug for the different Timeslot and different redirect statements) but allow you to use different Timeslots for different Networks. For example, have Timeslot 1 for Phoenix and Timeslot 2 for Brandmeister / RAYNET. This will allow you to select the Network of interest or, even, run two radios one on each Timeslot.
1.4.9. Reflectors – The Basics
Before Talkgroups there were, and on some Networks still are, Reflectors. A Reflector is effectively a User Activated Talkgroup. There are many more Reflectors on some Networks then there are Talkgroups. They tend to give access to specialist groups, such as ‘Hunting and Fishing’ and ‘Astronomy’. At the time of writing there are 92 (and 1481 Talkgroups) on Brandmeister, 374 on DMR+ and 18 on Phoenix (all linking to existing Phoenix Talkgroups) Reflectors all start with a ‘4’ and are four digits long. Brandmeister Reflectors are listed at www.pistar.uk/dmr_bm_talkgroups.php. DMR+ Reflectors can be found on the same site. If you are using DMRGateway all Reflector set-up calls are routed over the Brandmeister Network; assuming you are using the standard Talkgroup redirects.
The way to operate using a Reflector is as follows:
Put a Private Call out using the 4-digit ID of the Reflector, eg 4513, Hunting and Fishing.
Switch your radio to Talkgroup 9. This is where the audio will be. If you are quick you may hear a connected announcement.
When you have finished your QSO you should disconnect by making a Private Call to 4000. Listening on Talkgroup 9 you should hear a disconnect message.
If you don’t send a disconnect the Reflector (on a Repeater) will time out after 15 minutes.
If you really want to, this also works on Phoenix RF Repeaters. If you make a Private Call to 4400 on Time Slot 2, the Repeater will map the Local Talkgroup 9 on to Talkgroup 235 on Time Slot 1. Any transmissions then made on 9 Local TS2 will appear on 235 UKW on TS1. On all the idle UK Repeaters!
Oddly on a Phoenix RF Repeater, if you make a Private Call to 4504 you connect 9 local TS2 to Oost Nederland which is on Brandmeister Reflector 4504 (and Talkgroup 2044); not DMR+ 4504 which is listed as ‘Satellites’. However, if you Private Call 4850 you connect to DMR+ Reflector 4850 (New Zealand). It does seem to be a bit hit and miss as to which Network will carry a Reflector.
Lots other useful information can be found at: https://amateurradionotes.com/pi-star.htm
1.5. Code Plug
A code plug is an old name for the programming of the radio. You will need to use the software provided by the radio manufactures which likely only runs on Windows. The programming software is often hard to use when dealing with multiple Talkgroups and channels so it’s often simpler to use a spreadsheet application to make your bulk changes and reimport into the programming software.
qdmr - A GUI application and command-line-tool to program DMR radios. Copyright (C) 2019-2020 Hannes Matuschek, DM3MAT. This software works on linux system and provides support for a growing number of digital radios.
chirp - is a free, open-source tool for programming your amateur radio. It supports a large number of manufacturers and models, as well as provides a way to interface with multiple data sources and formats.
1.5.1. Contacts
Many radios support uploading an address book of contacts. Without which the radio will be displaying DMRIDs rather than call signs. These are usually imported as a CSV (Comma Separated Values) file.
Below are contact files for common radios ready to be imported. These files contain world wide contacts, which might not fit on your radios memory.
1.5.2. Zone
This is a collection or group of channels on the radio. This allows you to group together channels/Talkgroups, for example you could create a zone for your local repeater and add the Talkgroups to it making it easy to switch between talkgroups on the repeater.
1.6. Hotspot
The best way to access the DMR network is via your own hotspot. This gives you complete control of which DMR network you connect with and which talkgroups you want to communicate on. Building your own hotspot is very simple it doesn’t have to require soldering just a simple matter of connecting together two PCBs via their connectors. The most common hotspot to build is the Pi-Star hotspot.
You can usually build your own hotspot for around £50.
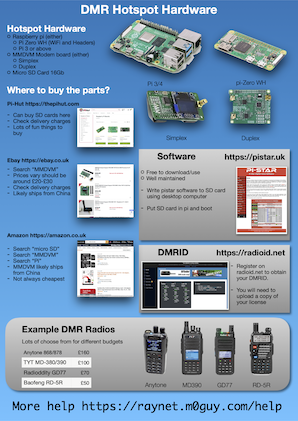
- You will need
Raspberry Pi computer ( Pi-zero, Pi 3 or Pi 4 )
SD Card 8Gb or bigger
MMDVM Modem board ( Duplex or simplex )
USB power supply
It is recommended to use the pi-star software, https://pistar.uk. This software is free to download and use and offer great flexibility and functionality.
On the right is an A4 poster with details of possible hardware. This is by no means definitive but provides an entry point in to DMR. Click on the image to download a PDF version.
Here are some of the different hotspots types you can use and details of how to set them up.