This short document shows you how to assemble the most basic Hotspot around – A Pi-star MMDVM device. This is constructed from two main boards – a Raspberry Pi single-board computer and an MMDVM Modem HAT.
Once constructed the Hotspot can then be configured using Pi-star software installed using a microSD card. This is dealt with in a separate note.
The Hotspot is very easy to put together and, at worst, needs only some header pins soldered to the Raspberry Pi board. If you don’t wish to do this then a version of the board is available with the header pins already fitted.
Sourcing the Parts
The best place to find the items needed is online; Ebay, Amazon etc. There are two main parts that you will need: A Raspberry Pi single board computer and an MMDVM HAT.
Any Raspberry Pi will do but the best fit is a Pi Zero -W. It is perhaps worth spending a little bit more to get the -WH version as this has the GPIO Header pins already soldered on. It must be a -W as you need the wi-fi for the internet connection. They may be slightly dearer but will be top quality if you buy from an official distributer. I buy mine from one of the UK suppliers (https://thepihut.com)
The MMDVM HAT is the modem / radio board. I prefer the ones with an on-board OLED Type 3 display. This allows you to see the hotspot is working without connecting to it over the local network with a browser. There are a large number of Chinese clones about and these are of variable quality. If possible, source the board from a UK supplier as it is easier to return faulty ones. The one I used for this document came complete with a case and aerial, pre-packaged in a box secured with Chinese tape. Presumably imported as a job lot and then resold. The leads for the display were too long and fouled the GPIO pins on the Pi. I simply cut them off but it did serve to show the build quality. Also, the board had absolutely no maker’s markings.
To make the hotspot work you also need a class10 microSD card. 8GB is more than big enough. Again, I source these from a UK suppler. You also need a microUSB lead to supply the power and possibly a 5volt 1amp USB power adapter. Get a lead designed to charge mobile phones as they have thicker conductors. There are inexpensive, official Raspberry Pi power supplies available.
The example shown here also came with a two-part metal case. This is a worthwhile addition but not essential. It all depends on where you are going to use the hotspot.
Assembling the parts
First gather the items together. This picture shows them laid out ready for assembly. The whole process takes less than 10 minutes! If you have brought the Pi Zero without the header pre-fitted you will need to solder in place the two sets of pins supplied with MMDVM board. These will need to be located either end of the row of connector holes.
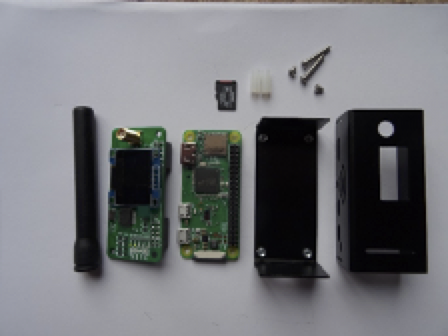
Left to right we have:
Aerial – comes with the MMDVM Board
MMDVM Board with display
Pi Zero-WH with microSD card
Two-part case with screws and spacers.
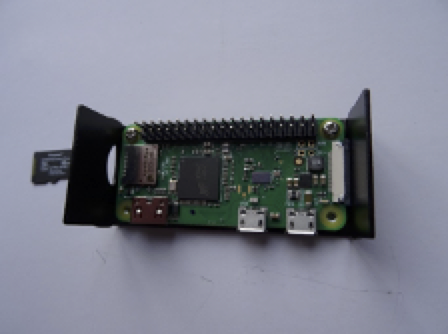
Step 1 – Fix the Pi Zero to the case base.
Make sure you fit the board the correct way around! The short slot in the case is for the microSD card, the longer slot is for a camera cable. It is easy to get it wrong.
Retain the board using the two short screws, one either end of the board adjacent to the 40-pin GPIO connector.
Don’t do the screws up too tight at this stage.
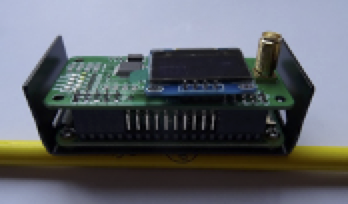
Step 2 – Mount the MMDVM Modem board.
This plugs onto the Pi GPIO Connector pins. It only fits one way around, just make sure it is properly located on all the pins.
Then, using the two spacers and the two longer screws, bolt through both boards into the base. Once all four screws are located, they can be tightened properly.
Remove the protective film on the display if there is one.
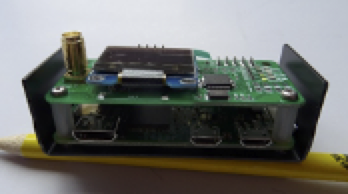
Step 3 – Fit the top part of the case.
This is the trickiest part of the whole process. The case is a friction fit and you need to ‘open’ the top part and ease it over the four mounting lugs on the bottom half end pieces. Make sure you get it the right way around – with the holes lining up with the various connectors on the Pi Zero board. You may find the case will need ‘adjusting’ with a small file to make the ports fit properly.
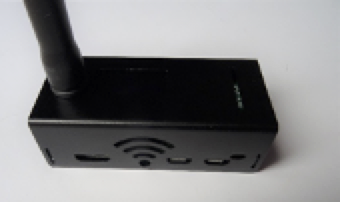
Finally screw on the aerial.
You now have an assembled Raspberry Pi based Hotspot. Simply insert the microSD card and power it up. Follow the instructions in the Software document and you should be up to speed in no time.